|
|
| ducatimeccanica.com - home |
|
I need to make a point regarding liability. I am not an engineer. I have no qualifications or experience of engineering. If you are interested in following this modification you must get it checked by a qualified engineer who can certify that it is safe. Do not do it otherwise. A number of people have been been in touch with me over the last couple of years in regard to the master cylinder brake sleeving modification to 1/2 inch as detailed on the NOC NSW site at http://www.amaze.net.au/~we/ock4.html Here follows the simple version... The story goes like this... The original Lockheed master cylinder as fitted to Norton Commandos from 1972 (and to some Ducatis) was given a 5/8 bore for reasons which only promote cynicism and do not bear repeating here. The end result was the brake did not work very well. The lever felt very wooden, and it was hard to get enough braking from it. I decided to try and improve the hydraulic advantage by sleeving the master cylinder down. I had experienced good results with a 1/2 inch Grimeca cylinder on a Norton so took that size as a reasonable objective. Having heard of seals from a Kawasaki GPZ 500 (EZ500 in some countries) being used for this I took that as a starting point. I obtained a M/C from one and drew up a piston which had the shape and width of the Kawasaki piston but otherwise the length of the Norton.
My master cylinder was sleeved in stainless steel. If using SS, and I would recommend it, the piston should be made from something hard but not SS. I recommend Aluminium Bronze 3. Do not use soft alloys. While they may stand up to the wear inside the cylinder they will pickup and smear at the contact point with the lever. There is no reason why the cylinder could not be sleeved in aluminium just as original, and the piston made in steel. But if you think about it those materials were chosen for poor reasons and we can do better. Why put steel in a rust prone environment?
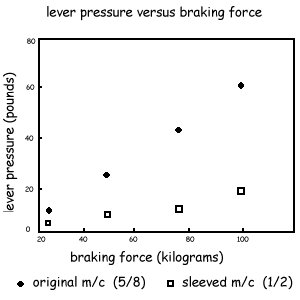
The Kawasaki seal kit number is 43020-1098. This may be an Australian part number, it's from a GPZ 500 from early eighties, single disc type. In the US this bike was called an EZ 500. There is an issue with the spring. I stretched the spring offered in the Kawasaki sealkit by 15mm. This is not ideal. The return spring pressure is OK, but only just. A Ducati person gave me a couple of good tips the other day. Either extend the front of the piston where the spring sits by 10mm ( point marked "C") , or make up a spacer cylinder about 10mm long by a little less than 1/2" diameter and with a 6mm hole through it, and slip that in the cylinder first. The suggestion was made that castellating the ends of the spacer might help avoid air traps. There is enough room for the spring to compress without binding with the spacer there. The original cylinder had a trap valve in the same end of the bore to slow the fluid in the downward direction (ask yourself, why would anyone make the brake slow to act? No, don't. ) Leave this out. It wouldn't fit the smaller bore anyway. If you need a new boot and spring clip they are available from the usual sources of Norton parts. The all up price in Australia is about A$67 for sleeving, $35 piston, $50 seal kit, a total of about A$150. Cheap for a good brake. Assembling the brake is exactly as for the standard setup. If anything about your setup is not standard, for example the calliper, or the lever (any change to the lever is significant, mail me if you need to know why), deep thought may be needed. I have not struck problems in the two I assembled personally or heard of any problems. Mine has now done in excess of 17,000 miles, most in tough city traffic. It gets a lot of hard use. I dissassembled it recently because the boot had ripped (it was not renewed when I did the sleeve job) and I could find no evidence of wear anywhere. The modification was printed in Classic Bike Mechanics Oct 1998. The article included an interesting (and compelling) before and after comparison test as follows...
The best way to describe the end result of the modification is to talk about reduced lever pressure. It takes less lever pressure to achieve the same braking affect. The graph is a good illustration of this. I would recommend the change to a nylon stainless braided line at the same time. If anything promotes feel it is not having what is essentially a balloon attached to your brake. The increased fluid pressure with the modification means even more balloon effect. When I first did the modification I made much of the ability to lock the front wheel (do not do this at home..!) with the new brake. Subsequently I have realised I was tricking the front into locking up. If you suddenly pull the brake on you have less of the tyre on the ground than if you squeeze it slowly. When you squeeze it slowly you force the tyre down on the road more firmly, increasing the contact area. The new brake may lock up the front still, but I have not tested it to that point. Chris Ghent we@amaze.net.au
|